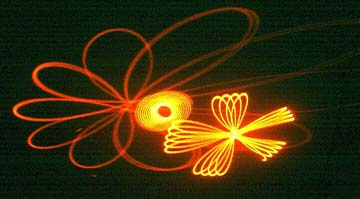
Troop 272's Laser Light Show --Danger DO NOT LOOK INTO A LASER BEAM--
It will burn your eyes!
This project took five meetings (and a bunch of leader time) to construct eleven systems.
The goal was to learn about soldering, basic electricity, Lasers, and have fun.
What You Need:
35 1x CD-ROM drives and a bunch of scrap Floppy Drives got torn apart.
We salvaged the DC motors from the CD-ROM drives.
Most ran on 1.5V, a few on 12 Volts, you what 1.5v motors.
At Hobby Lobby we got 30, 1/2" Furniture Buttons (210955) for 99cents.
Laser Levels cost each boy $7.50 1/4" x 2.5" Bolts to tripod mout the lasers
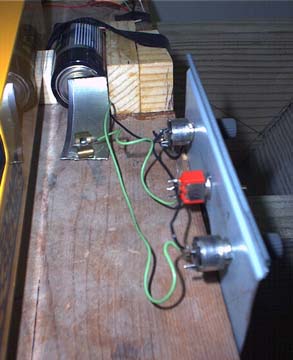
Salvaged 1K to 500K variable resistors (the 1K worked best, but free is free).
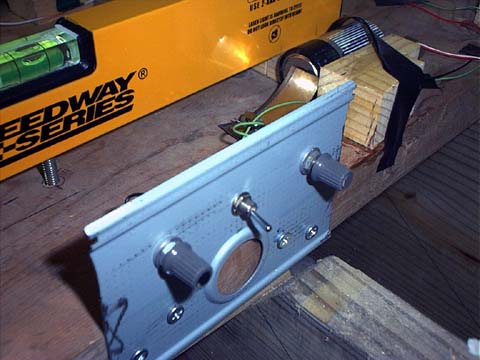
Salvaged On-Off switch, Mirror tiles 1/2" squares (Tile Land??, Disco Ball)
Salvaged metal plate from a CD-ROM for a control panel
A 2"x4"x4'cut up in to 1" wide strips x 4" and some with 1" holes drilled in to mount the round motors.
Wire
Epoxy (6 minute stuff, all epoxy work was done by the leader, away from Scouts).
Mixing cardboard and popsicle sticks for mixing)
Tin Can (for battery contacts)
Screws (3/4" wood screws to attach control panel and battery contacts)
Plywood base material (I used 2x or 3/4" plywood for this, 11 took <1/2 a sheet of plywood
Tools You Will Need:
00 and 0 and 1 philips screw drivers (RadioShack has a set of all Philips precision screwdrivers to take apart the CD-ROMs)
solder irons and solder
1" drill bit
Precision measuring tool (dial calipers) to measure motor shafts
Small drill bits (I bought a tri-dex 3 in 1 drill set with numbered bits 1-60, lettered A-Z bits and 64th" to 1/2" for $20
Wire cutters and Wire Strippers
Hack Saw (to cut 1/4" bolt that mounts the laser to length, sawsall is great too-- but not for the boys)
Jig saw or other way to cut wood to length, Skill saw to cut 2x4 to 1" strips
Tin Snips (for cutting the control panel -- cover the sharp edges with Duct tape, and battery contacts)
Driver/Drill #2 philips bit, screw drivers, pliers, etc.
Match book (to hold the Button up off perpendicular just a bit, when drilling)
Rivits (to mount some of the on-off switchs, the boys liked the pop rivit gun, other switches used a 1/4" hole)
Key Elements:
Get your motors, test them to make sure 1.5 volts will run them!
Measure the shafts, group the motors by shaft size.
Drill a hole in the center of the rounded side for the wood buttons (not all the way through)
place the button in a pair of pliers to hold it, one edge raise by the thickness of a
match book cover paper. Drill (using the # drill bit, and small drill press for squareness) a slighly off perpendicular hole.
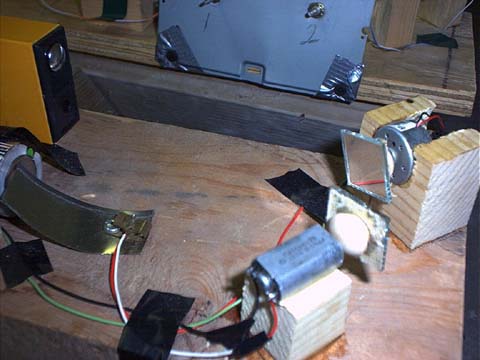
Glue (using epoxy) the mirror (1/2" square mirror tile) to the front/flat of the wood button
let it dry, next meeting glue the button to the shaft of the motor (fast set super glue or epoxy),
don't let glue get on the moter, just the shaft (I screwed up one motor this way).
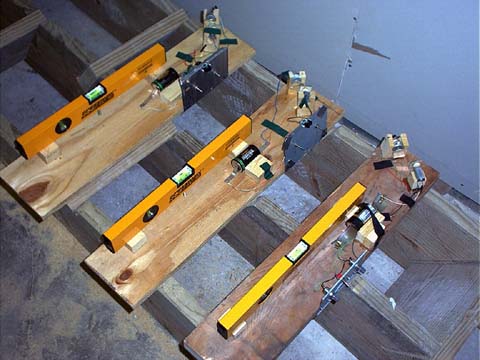
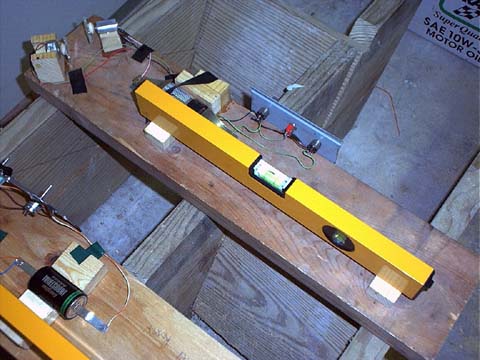
Mount the laser on blocks (about 1" up), counter sink the 1/4" bolt into the plywood
We wanted our laser level removeable for our Survey MB class. Set the laser on the two blocks.
Cut the 1/4" bolt to fit into the laser 1/4" (put two nuts on the bolt, cut it, unscrew the nuts.. clean threads)
Cut four inch blocks, drill a 1" hole in them at one end, mout the motor/mirror in the hole (or for flat sided motors
just epoxy it on top of a block. Let dry.
turn the laser on and shine on to the mirror/motor, measure to cut block lower so laser shines to middle of mirror.
Trime block, epoxy on to board, so laser bounces off mirror to the next mirror (90degrees). repeat for a second
and/or thrid mirror/motor...
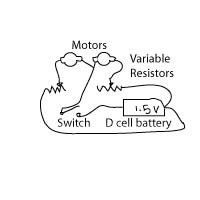
Get help with the electronics Just battery to switch to variable resistor to motor to battery.

Creative motor reverser, Pulse Width Modulation circuit to run motors smoothly slowly.